If you’d like the sound quality of your iPhone to be sounding as great as it can be, you’ll need to understand how to cleanse iPhone speakers. Like that of the charger port, iPhone speakers are prone to be impervious to dust and dirt in time. This can result in poor-quality sound coming from your iPhone and also calls that are difficult to hear. This is why you should ensure that your speakers are clean once it’s at this level.
The problem is that iPhone speaker are quite delicate. If you’re overly aggressive or employ the wrong approach, it is possible to cause harm. Cleaning your speakers isn’t like learning to clean your iPhone case. However, it’s completely feasible. We will walk you through the best methods to clean your speakers and what you should avoid doing. This article will show you how to clean iPhone speakers.
Things to be aware of prior to cleaning your iPhone’s microphone and speaker
Before you begin cleaning your iPhone microphone and speaker, there are a few points you should keep in mind to ensure that you don’t break the iPhone components.
What is where is the iPhone microphone?
The primary microphone on the iPhone is at the bottom-left corner of the device in the majority of the series. There’s a tiny gap between the camera on the rear as well as the flashlight. It’s the small, circular openings on the left side of that iPhone charge port. Additionally, the latest iPhones also include an audio microphone in the back of the case. This is to block out noises from the iPhone.
Cleaning best practices for iPhone the microphone and speaker
- Remove the iPhone from the cord before you begin cleaning. It is also possible to switch off the power while you are cleaning.
- Do not use metallic objects to scratch microphone ports or speaker mesh. The mesh could be damaged and cause damage to the microphone and speaker.
- Do not use water to wash any area on your iPhone. Although some iPhones are water-proof but adding water intentionally to certain models could result in damage.
- Even when you’re using non-metallic materials to scrape the speaker, make sure not to scratch the mesh.
- Apple suggests that you stay clear of using cleaning products that contain hydrogen peroxide or bleach.
- Make sure you don’t immerse your iPhone in any cleaner fluid.
How do you properly clean your iPhone’s speakers without harming them?

how do I clean my iPhone speaker
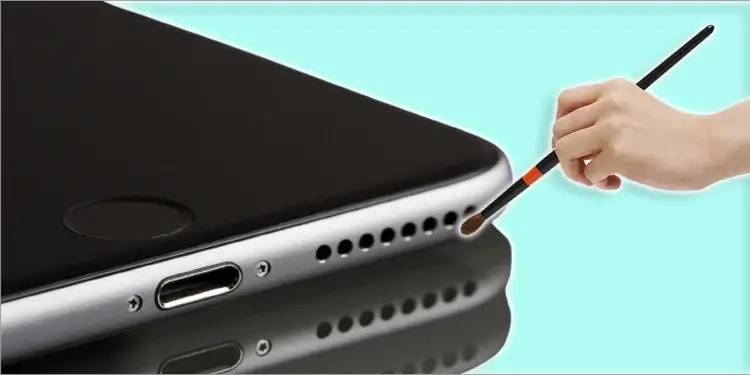
The best method of removing dust and dirt from the speaker on one side of an iPhone is using a brush with soft bristles. Ideally, it should be using a tiny paintbrush. Think about trimming the bristles to a half-inch in length for better control.
Brush gently across the speaker from the bottom to the top and then move across the thin, long speaker multiple times. Make sure that the brush is not dragging along the axis of the speaker. You can also insert soft bristles through the holes in the lower part of the telephone.
Painter’s tape
Another method of cleaning iPhone speakers is using painter’s tape.
Take off the case and screen protectors in the event that they are present you have them, and remove them from the iPhone.
Use a flashlight to get greater visibility on the speakers.
Now, place a small piece of painter’s tape on the point of your finger with a sticky edge to the side.
Next, slide your fingers between the speakers to remove the dust. Make sure that you’re not placing too much pressure on the speaker.
Toothpick
The iPhone 13 Pro Max’s sound system is being cleaned using an instrument.
Toothpicks can be used to accomplish this purpose; however, be cautious since they can cause damage to the internal organs if they are used improperly. This is why you should try this entirely at risk. Toothpicks are best used on the speakers in the lower part of the room near the charging port when you can clearly see that they’re blocked.
Get rid of your phone case, if needed, and keep your flashlight handy so that you are able to be able to see what you’re doing.
With the sharp edge of a plastic or wooden toothpick, place the toothpick through the holes in your speaker slowly. Do not apply pressure while you go through this process, and do not push further until you notice resistance.
Then, gently tilt the toothpick in the opposite direction and upwards while you remove it until the debris is flung out. Be sure not to lower it to prevent the risk of damage.
Use air dusters/compressed air.
While Apple warns users not to use compressed air for cleaning the iPhone but it is effective when you know how around it. The compressed air can help remove the dust that may have gotten into the interior of the speaker while cleaning. Be cautious when using compressed air on your speakers (especially those on top). The first step is to purchase an aerosol-compressed gas can, such as Falcon Dust, on Amazon.
Then, follow these steps to cleanse your speakers by using compressed air:
Make sure that the air can is up straight.
Clean the top of the speaker:
- Set the air compressor just a few centimeters from the speaker, making sure that it is pointed at the hole in the mesh and not at the screen.
- Use a few blasts of air to loosen the dust.
- To blow dust particles off the speakers at the bottom then, point the air blower toward the openings and apply a few blasts. But make sure that you leave some space between the air blower and the mesh.
Test iPhone mic
Then test your microphone’s capabilities by taking a recorded voice note with a voice memo using the Voice Memo app. Note any improvement in the quality of the recording. You could also contact someone you trust to inquire whether they can understand your voice better.