After making edits to the Google Slides templates, let Google Slides auto-advance or play your slides in Loop while presenting your slides or uploading them to the internet. Below are a few simple actions to make your presentation loop Google Slides when giving your Slideshow or sharing the slides online.
How Do You Make Google Slides Play on a Loop?
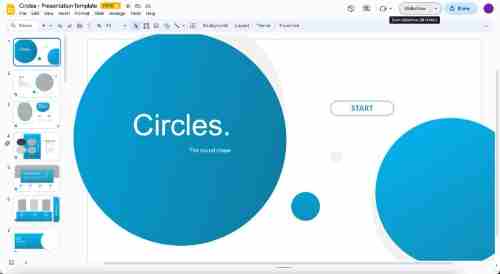
To set your Google Slides presentation to Loop, change it to Slideshow mode. Then, you can choose Slideshow from the menu at the top or click the arrow keys to begin the presentation. View in the Presenter or on the slide that is first.
Find Slideshow mode within Google Slides.
In Slideshow mode, select the three dots on the bottom, then choose Auto-play. It is possible to select Loop to run the Slideshow in continuous loops and also choose a specific time to play the Slideshow within a particular duration (e.g., each minute).
How can I Get Google Slides to Autoplay?
Google Slide has beneficial features that allow users to create high-quality, professional-looking presentation slides. One of them can be described as “Autoplay.”

For more information on how to utilize this feature within Google Slides, follow the detailed step-by-step instruction in the following:
Step 1: Select the Publish to Web option.
Then, it would be best to open the presentation slides in Google Slides. After the slide file has been opened, click “File” on the right-hand side in the upper left corner. The dropdown menu will let you choose”Publish to the Web” from the “Publish to the Web” option.
Step 2: Click the link
The dialog box. Then, you can choose “Link” or “Embed.” If you select “Link,” it will provide you with the choice to choose the delay. If you prefer “Embed,” you can set the size of your slide and the delay time between slides.
Step 3: Choose the time for auto Advancing Slides
Choose the delay between slides. You can set 1,2, 3, 5, 10, 15, 30, or 60 seconds as a time delay on Google Slides. Look for the “Start your slideshow as soon as the presentation loads” option.
Step 4: Make Your Presentation
Then, you can click “Publish.” This will provide you with a link to open your slide if you select “Link” in step 2.
Step 5. Please copy the link and then share it with others.
Be sure to take a copy of the URL and then share it with your target audience. When someone visits this URL to access your slide, the slides will begin playing immediately after they click on the decline.
If you select “Embed” in step 2, this will result in the embed code. This is helpful if you intend to share the presentation on a website. When someone goes to the site, your Slideshow plays immediately.
However, what happens if you’re not willing to share your Google Slides presentation with others but instead wish to apply this with your expression? Learn how to accomplish it in the following article.
Alternative Formatting Options for the video
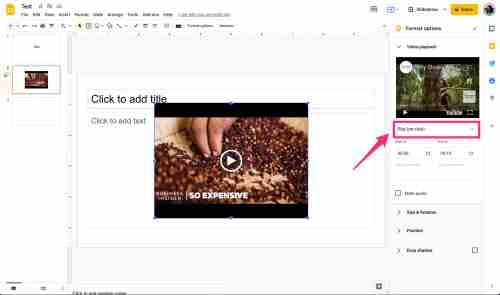
In addition to Autoplay, numerous other methods use the Format menu to organize the video. You can change the movie’s precise beginning and end times. It could be instrumental if you only require an exact portion of a lengthy video.
In the Autoplay, you’ll find an option to Mute the video feature while presenting. Therefore, the audience will only see the image if the sound isn’t required (or isn’t suitable).
In the Drop shadow feature, you can create depth in the thumbnail of your video by casting a distant or close shadow over your slide’s background. The video is an element of the decline rather than arising out of place.
If It’s Not Comfortable – Switch the device off.
There will likely be speeches where the video’s preview must be in motion until the end of your address. Therefore, if you don’t want a video to start at the first moment, it’s recommended to turn off auto playback. This way, you’ll avoid discomfort and require you to shut it down manually.
If your video needs to be motionless, adhere to the steps in the previous section of this article. Uncheck the Autoplay in the presenting options.
What is the purpose of an automated PowerPoint slideshow?

The delivery is crucial when working through the PowerPoint presentation. The process of clicking to navigate slide by slide could be disorienting and may even ruin your flow. To keep from interrupting your flow by clicking, creating the PowerPoint slideshow that automatically advances slide-by-slide can be an excellent device. It allows you to concentrate on the message you’re delivering and not worry about whether you’re showing the right slide or not! A Pecha Kucha presentation can be used using an auto-running PowerPoint slideshow.
Making a PowerPoint slideshow that runs automatically could help with publicity. If you’ve got a booth or kiosk with a self-running PowerPoint slideshow, it will allow you to get more attention without needing to talk one-on-one to an agent for sales. PowerPoint is a visually attractive tool and could be extremely useful as a “background” of sorts.
There’s even a self-running PowerPoint presentation if you’re not physically in the room. Add audio, recordings, voiceovers, and laser pointer movements to ensure your audience receives the most value from the presentation. Self-running PowerPoint slideshows that you can send to the audience or leave them on their own for the audience.
Final Affirmations
Google Slides slideshows can be played continuously in Slideshow mode, shared with a direct link, or embedded on the web. Select a time for the Slideshow to be played back, depending on the requirements of your business. You should review the Loop to ensure that the slides don’t play fast enough and that you can create the impact you wish on your visitors through looping the slides.