Windows 11 has a feature allowing users to map their network drive to access the files and folders easily from File Explorer. You can map a Windows 11 drive network.
Part 1. The Network Discovery Feature is now active.
Turn on Network Drive first. You can do it by following the instructions below.
Step 1. Click Win + S and type Control Panel into the Search field. Choose the Control Panel that is the best match.
Step 2. Select the Network and Sharing Centre and then change View to Large Icons.
Windows 11 Network and Share Center
Step 3. To turn on the network discovery, click Turn on under Network discovery.
Under the File Sharing and Printer Sharing section, click the On file and printer share option to turn it on.
Windows 11: Network discovery turned on
Step 4: You can confirm your operation by clicking on Save Changes.
Once you have done this, Windows 11 should map the network drive without issues.
Part 2. Windows 11 – Map Network Drive
Step 1. The first step is to right-click Windows at the lower left corner of the Taskbar. From the menu context, select File Explorer. If you want to access the File Explorer, press Win+E keys.
Step 2. Then, click the “Three dots” icon on the top toolbar. Select the Map network drive option from the dropdown menu.
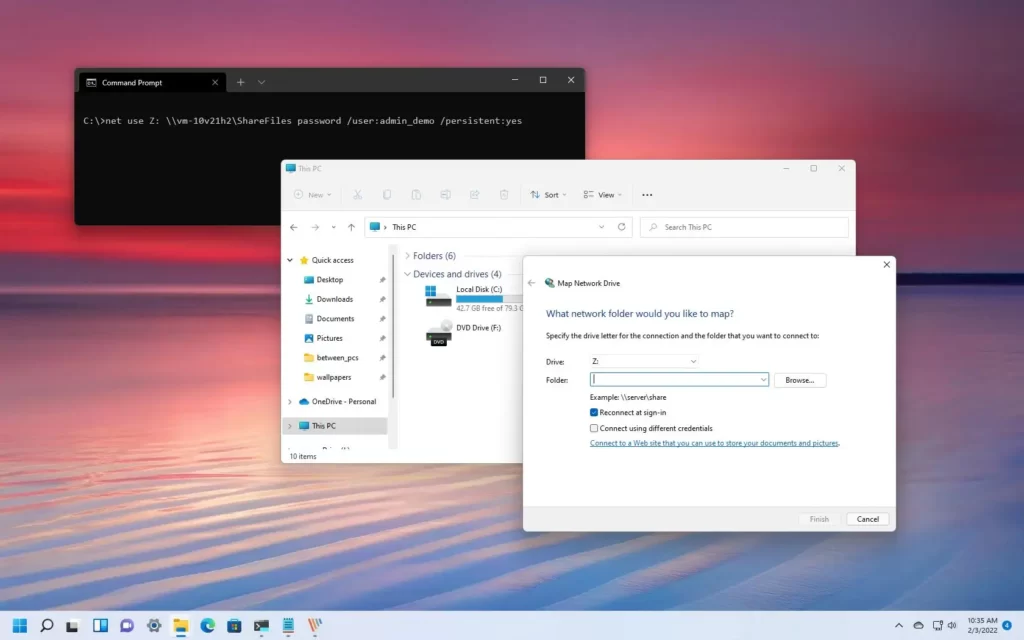
Step 3. You can select a drive name for the network share from the Dropdown Menu. Then, could you enter it in the Folder Field? Select Browse to browse all available devices in your local network. When you are finished, click Finish.
Tipp: To make Windows 11 reconnect automatically to your network every time you log in, select Reconnect on sign-in. You can connect by using different credentials. Check the box Connect using a new certificate.
Windows 11: How would you map a network folder?
Then, proceed to Step 5. Windows 11 will then attempt to connect the drive. If you selected Connect Using a Different Credentials or the default credentials failed, you must type in your username and password for the network drive.
- Check the box to Remember My Credentials if Windows 11 is supposed to remember my username/password.
- The network drive will not connect.
- Windows 11 is now able to connect to the selected network drive. It will then map that drive letter. The mapped drive will be visible in the Network section of the File Explorer.
- “Windows
How to Disconnect Network Drives in Windows 11
How do you turn off a Windows 11 Network Drive? To disconnect the mapped drive in Windows 11, open File Explorer. Choose This PC and then click the three dots icon. Next, select Disconnect Network Drive. Choose the network you want to remove from the list and click the “OK” button.
What is the network drive?
A network drive is an external hard drive accessible only over a computer network. It is not the same as your local disk drive, which you can physically connect to your PC. Local campaigns are only available to that computer user, while a networked drive allows multi-computer access.
Once the sharing is set up, all network users will have access to the shared storage space. This feature is incredibly helpful if multiple users or computers are on the network and must access the same files regularly. Network drives often come in the form of NAS. NAS comes with a simplified OS. However, not all network drives include their system or OS.
What does it mean to “map a drive network”?
The network path can usually be found by entering the drive’s name. Entering your network path over and over again is tedious. Windows allows users to map the network drive. This is done by giving it an alphabet. You can use this shortcut to access your network drive without remembering its path. Because network drives are often set up between multiple computers with many users who might not have the same expertise level, it is convenient to map the network drive. In the same way you would access any other files stored on your PC, it’s easy to map the network drive.
How to map and remove a Windows 10 network drive
Windows File Explorer opens. File Explorer is available by selecting it with the right click on Start.
To view your local drive, click “This PC”.
In the menu bar, you’ll find Disconnect network drive. The Disconnect network drive option will be available on your toolbar.
Choose the network drives you would like to disconnect and then click OK. Clicking on this will remove you from that drive.
You can delete and unmap the drive by clicking on the trash icon after right-clicking on its icon. It will then be possible to delete the drive location and make room for the new letter.
Why do you need to map the network drive in Windows 11?
Windows 11’s mapping of network drives is the process by which you can connect to an existing shared folder on a computer and make it appear like a local hard drive. The shared folders will appear on your computer as they are stored locally. This article summarizes some common reasons you may want to map a network drive on Windows 11

- You can transfer files quickly and easily between different computers.
- The network path can be omitted, making finding files stored in shared network folders easier.
- Accessing files locally is generally faster than via the network.
- File Explorer on Windows 11 allows users to locate network drives.
- These steps will help map a Windows 11 network drive using File Explorer.
- Open File Explorer Windows 11
- Then click the This PC button in the left-hand menu.
- Then, click the See more button (3-dot) in the command line and choose “Map network drives.”
Explorer map network drive option
You can assign a drive by selecting a letter in the dropdown “Drive” menu.
In the field “Folder,” enter the path on the network to the shared directory. If you prefer, click Browse to select the desired folder for mapping as a drive and click OK.
- Windows 11 network map drive
- Select “Reconnect on Sign-In” to permanently connect.
- Use the different credentials option to connect if your credentials differ from those you currently use.
- You can click Finish to finish the process.
- Windows 11 will ask you to confirm your network credentials.
- Press the OK button.
- File Explorer will now show the network drive.
- Instead of using the computer’s name, you can enter the IP Address if connecting isn’t impossible. The remote device may use dynamic IP address configurations, requiring you to reconnect.
Create a local Microsoft Account to connect if your device uses the Microsoft passwordless account. A mapping that doesn’t function will be impossible.
This page is about
This article discusses a “network drive,” why it is necessary to map it on Windows 11, and three possible ways of achieving your goals. Windows 11 File Explorer, as well as Command Prompt, may be of assistance.
The easiest option is to use AOMEI Backupper Standard by AOMEI, a free third-party program to save files on a shared network drive so that you can view them instantly. It supports several backup methods and can be used with multiple Windows operating systems.
Aside from being a fantastic restore program, it is also incredibly easy to use. It is easy to restore data from backups. Universal Restore is also useful to repair your system backup onto a new computer. To learn more, you can also download the software.