There are times when I have to record the screen activity of Windows to record a tutorial, online course or demonstration. If you’re working on a presentation, making a tutorial video, or preparing an idea to upload to YouTube, You may also want to capture your screen activities within Windows.
Additionally, The top Windows laptops that you can purchase today
Many third-party programs can do the job, including some that are free while some paid. Instead of downloading and installing third-party software, benefit from a handful of functions built into Windows.
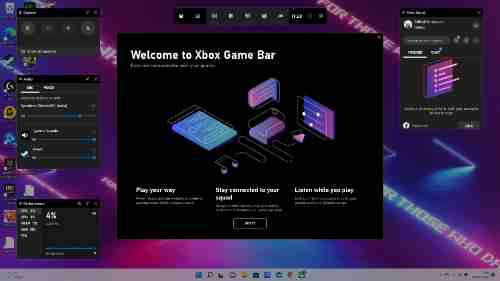
The tool is accessible on Windows 10 and 11, available in Windows 10 and 11. Xbox Game Bar video-capture tool is specifically designed to record games on your computer. However, it’s a highly versatile program that can record all other types of screen-based activity.
What can I record of activity on screen in Windows by using the Xbox Game Bar
- Navigate to Settings
If you use Windows 10 or 11, go to Settings > Gaming > Captures. Screens appear different in Windows 10 and 11. However, the settings remain identical.
The default location for your screen recordings is stored in the user folder of your account under VideosCaptures. However, you can alter the area of your recordings if you want. The next step is to record an activity that’s been recorded.
When using Windows 10, please turn on the option to Record in the background when I’m playing. On Windows 11, turn the record button to see precisely what happened. Then, you can set the length of the recording background. Select the dropdown menu to Record the last option to choose a duration that ranges from 15 seconds up to 10 minutes.
- You can enable recording features
Then, make sure to check the box for Record even when my laptop isn’t connected and when wirelessly projecting my monitor to allow both of these options.
Select the dropdown menu to select Max recording duration for 30 minutes, one hour, 2 hours or four hours.
- Allow audio capture and control when recording the screen
Switch on the toggle to recording Audio whenever I record an event or to record Audio during the recording of the game. Then, you can set the audio quality and the volume that you record with your microphone, as well as the importance of your computer.
- Switch off the Capture mouse cursor during the recording of a game
The suggested frame rate is 30 frames per second. It is possible to increase that to 60fps. However, 30 frames per second should be sufficient for most video recordings. The default video quality for recording is set to standard. However, you can alter it to a higher rate if needed. You can also remove the button for capturing mouse cursors when you record an event if you don’t usually record your mouse cursor. - Keyboard shortcuts for control
A variety of keyboard shortcuts are available to operate the Xbox Game Bar. On Windows 10, you can see and alter your shortcuts from the screen for Settings. To do that, visit Settings Games > Settings Xbox Game Bar.
How do you screen Record in Windows 10 & 11 with Microsoft Stream? Microsoft Stream app
The Stream application is just one of the numerous tools available within Microsoft 365. The Microsoft 365 bundle sits in the same category as traditional Windows applications like PowerPoint, Word, and Excel.
The idea behind it was to ease the process of making videos for users of Microsoft devices. It’s also the ideal tool for recording screen-based recordings if you’re already a Microsoft 365 user.
How to capture your screen using Windows 10 & 11, using the Stream application:
- The screen recorder is accessible in Stream
Start by opening the Stream application. When inside, go to the screen recorder, selecting the option to create > Record Screen or Video in the menu navigation. - Configure your devices
Decide which device you would like to use in your video by choosing any of the following choices from the Screen and Camera dropdown menu:
Screen Only, to capture only the screen of your computer.
Camera: Only record your webcam.
Screen and Camera are for recording your computer and webcam screen simultaneously.
- Begin recording
When you’ve selected what you’d like to record, you’re ready to begin by pressing the recording icon in red. Then, you’ll be asked whether you wish to capture your entire screen, a specific area, or even a particular tab on your web browser.
If you’re interested in recording your Audio from your microphone, Click Share Audio (and make sure you read this post about how to record excellent Audio).
Once you’re finished, you’re ready; click Share. Your recording will begin after the three-second countdown. For a stoppage of your recording, click your Microsoft Stream Screen Recorder tab within your browser, and then click Next to go through your recorded recording.
The maximum you can make a screen recording with Microsoft Stream is 15 minutes.
- Stop or stop your recording
If you’d like to stop the recording, just hit the Pause button. Once you’re prepared to resume, click on Record again. When you’re done, click Next in the lower-right corner of the screen. - Edit and review
After you’ve completed the recording, you’ll see an overview of the screen-based recording. In this preview, you’ll also be able to cut the beginning and ending of your video using the controls in the timeline. - Upload and stream
Once you’ve reviewed the recording, you can transfer your recording, and after reviewing it, you can upload it to Stream. If you’d like to distribute your recording with others beyond Stream, then save it on your computer.
How To Record Your Screen with the Snipping Tool
The Snipping Tool helps create screenshots or record your screen into an audio file. It can also include any audio playing on your system. It’s included in Windows 11 and is accessible using the Win+Shift+S keyboard shortcut.
Learn how to record your Screen in Windows 11 for a walkthrough of how to do this with the Microsoft Snipping Tool, but here’s an overview: Launch the tool, select Record, select an area on your screen you wish to record and then click the Start button.
Another method to record screen with Audio
There are a variety of applications for third-party screen recording that come with tools to edit video, like Snagit Screenshot Captor and ShareX. As an example, Snagit allows you to extract specific frames and then make GIFs. Read our tutorial on recording your desktop screen using VLC for the free program.