As a part of System requirements, in addition to the Trusted Platform Module (TPM), the device needs to be equipped with “Secure Boot” enabled to install Windows 11.
Secure Boot is a security feature found on all contemporary hardware that runs a UEFI firmware that provides a safe environment to boot Windows and to stop malware from stealing the system throughout the booting process. Also, Secure Boot allows the computer only to boot using trustworthy software supplied by OEM. (OEM).
One of the benefits of this option is it provides a safer experience. This is one of the reasons Microsoft is making it mandatory to install Windows 11. The main issue is that turning on the feature will make running alternative operating systems like Linux impossible.
What is Secure Boot?
Secure Boot secures the process of booting against threats to security from malicious software such as ransomware and malware. Secure Boot is firmware-dependent and will require that your computer’s BIOS is configured up to UEFI mode.
Turning on Secure Boot for Windows 11
Secure Boot: The Secure Boot tool checks the digital signatures for drivers, operating systems, and firmware each time you power on your PC. Activating Secure Boot is a little complicated, and it’s worth checking whether the program is active.
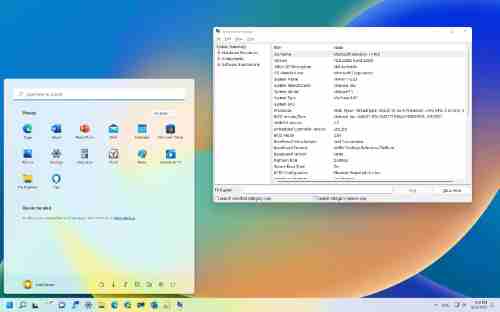
For a quick check to see to see if Secure Boot is already enabled:
1. Click Start
2. Type System Information into the search bar, and then press Enter
3. Search through the database of system files to discover Secure Boot
4. Check that the label reads”on” or “off.”
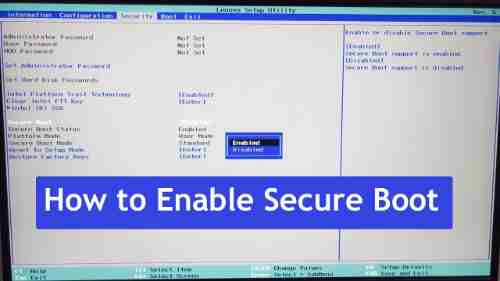
How do I allow Secure Boot in Windows 11?
If Secure Boot cannot be turned off for reasons of any kind, Windows makes it relatively simple to fix:
1. Restart your PC, and then be patient until you see the BIOS splash screen.
2. Once the BIOS window appears, click the button that will open the BIOS window. It is usually either F12 or Delete.
3. The BIOS menu will vary according to the model. However, you must navigate to the Security Settings page. It could be located in advanced configurations
4. You must hunt for the possibility of switching on Secure Boot. This will probably be an option to toggle or drop-down menu
5. Exit BIOS and save the configurations
6. Restart the system.
What is Secure Boot, and why is it vital?
Secure Boot is a security tool that functions like an array that checks and balances. Instead of waking up your system and carrying out what is technically equivalent to holding its hands and hoping no malware exists, Secure Boot contains the digital signatures of your drivers, operating system, and firmware.
When a computer with UEFI is started, it confirms that the software is authenticated digitally. The presence of Secure Boot Active means it tests the bootloader’s digital signature to ensure it’s not altered. It then begins after it has passed these checks. If the tests across all the statements don’t match, Secure Boot will send the system to a recovery process to verify that everything is restored in the correct order.
Secure Boot is developed to counter rootkits’ threat. Secure Boot is one of the most sophisticated malware families, which runs in kernel mode and has identical privileges as the base OS. The malware can conceal completely, evade the login process, store passwords, capture cryptographic data, and perform other malicious features. Bootkits, in particular, are the kind of rootkit that Secure Boot aims to protect against. The bootloader is replaced so that your PC can load the bootkit instead of the PC’s instance.
Secure Boot isn’t a new feature. It first came into use in the Windows 8 era and shipped on each Windows 10 device. Secure Boot is one of the system’s many essential prerequisites for running Windows 11. Every certified version of x86 Windows PCs must include Secure Boot enabled by default. Trust Microsoft’s certificate and let the user configure Secure Boot to trust other bootloaders not associated with Microsoft, as well as allow users to turn off Secure Boot altogether. However, changes made to Secure Boot must be manually completed because this will prevent software from altering settings or turning off this security layer.
Secure Windows 11 from Malicious Attacks by activating Secure Boot.
This is how you can activate Secure Boot for a Windows 11 PC. If you are committed to protecting your system from corrupted bootloaders and unauthorized ROMs and ROMs, you should enable secure Boot. If you want to turn off the other critical security option on your PC, allow TPM on Windows 11. This will ensure that all your credentials are protected and stored on your PC, which will enhance security in Windows 11. If you have any concerns, don’t hesitate to contact us in the comments section below.
What Happens If I Enable/Disable Secure Boot
Because the Secure Boot is a protection mechanism, turning on the Secure Boot keeps your PC secure from malware attacks. There are malware programs that are loaded immediately after you boot your computer. These are known as Rootkits. Rootkits can keep passwords, login information, keystrokes, move sensitive data, and even take cryptographic data. To ensure data security, high speed and smooth operation is essential. It is necessary to allow a secure Boot.
But, if you’d like to run older Windows and certain graphics cards or unauthorized software, Secure Boot should be turned off. Once you have turned off the Secure Boot, the computer does not check for its digital signature with the OS. Therefore, you can take the following steps:
- Windows booting Windows using external hard drives or USB.
- Dual Booting is similar to Windows and is possible using Linux and Fedora.
- Windows booting using Windows tools for recovering passwords.
- I am running the Windows version before the previous one.
The Bottom Line
SecureBoot is a highly secure function that protects against viruses and malware. It improves the performance, speed, and performance of your PC. It is compatible with Windows 8 or above. But, if you require to use older Windows or untrusted applications and graphics cards, it is necessary to remove these.
This article offers a step-by-step procedure for how to activate or disable Secure Boot. To ensure you can use this feature according to your needs, take a look and tell us your thoughts about Secure Boot.