Sewing machines can appear highly complicated to those who don’t know how to use them. Don’t let the anxiety of a device that isn’t yours and lack of experience stop you from making stunning, unique textiles! Follow this step-by-step tutorial to learn about the sewing equipment’s anatomy, setup, and operation to ensure you can start creating your handmade items.
What is Sewing Machine?
The sewing machine stitches fabric with a thread and needle that work up and down. Although early sewing machines were operated manually – usually using a spinning wheel, modern pieces of machinery are powered with electricity, and users press an accelerator pedal to set the speed of stitching.
Things You Need to Be Able To
- Learn about the Machine’s spool-pin, threat guide, and bobbin-winder—the stitch adjustments buttons, the tensile dial presser foot, and other essential parts.
- Set your Machine on top of a solid table, and then insert the needle. Inject the Bobbin and wind before threading the Machine, and take both dangers out.
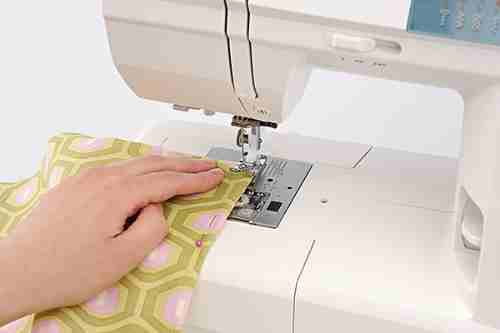
- The Machine should be set to straight stitch at first. The fabric should be lined up under the needle. Then, lower the foot of the presser onto the fabric before pressing the pedal.
What are the three types of Sewing Machines?
There are three primary kinds of modern machines for sewing, each one powered by electricity, but differ in their other parts:
- Machines for sewing manual. The least expensive and most straightforward sewing machines, manual machines employ levers and knobs to decide things like lengths of stitch and widths.
- Electronic Sewing machines. Electronic sewing machines use push buttons to calculate things like lengths of stitches and widths.
- Sewing machines that are computerized. Computerized sewing machines are expensive and complicated and have touchscreen displays to identify the stitch. Automated machines also include memory cards that allow users to save patterns and presets and download patterns and stitches.
SEWING MACHINE Parts
How to operate an automatic sewing machine? Identifying the parts:
- Switch for on/off. Begin by determining which Machine is turned between on and off. It’s usually located on the back on the side of the device.
- Bulb The bulb is located in the needle. Test it. If the light isn’t sufficient enough, you might need to move the Machine closer to a window to get extra natural light.
- Pedal The pedal on your foot that controls this Machine…your accelerator!
- The speed limiter ensures that you don’t overstep the limit of speed. Specific machines may feature a switch on their foot that allows you to select between low and high rates.
- Stitches – Stitch width and length buttons, decorative stitches, and zigzags. The cheapest sewing machines come with set stitches and lengths. However, more expensive machines let you adjust width and height independently. This is also true for the buttonhole stitch settings.
- Tension wheels are usually located in the front or the at the top of the device. They are essential for getting an even stitch with no loops.
- The plate and the foot presser together with a stitch guide.
- Needle and a small screw to hold the hand. It is essential to locate this to switch needles.
- BobbinThe lid is opened to reveal Bobbin’s case and the Bobbin itself.
- Tension screws for bobbins are usually located on the bobbin cases in front-loading machines.
- Oiling: Check for marked oiling points and ensure that you are using the right oil for the Machine you are using. Specific newer models are sealed units that do not require oiling, so make sure you know this before pouring oil around.
What is HTML0? Use Machine to Sew Machine:
BEFORE YOU LEARN
This guide will outline the fundamental procedures for setting up a sewing machine and its operation. However, keep in mind that instructions may differ for different sewing models. If you are unsure, consult the manual for your Machine’s specific instructions for setup and operation.
Before you begin:
- Put before proceeding, place the sewing device on a stable table at a level that is comfortable for you.
- Be sure pressing foot and needle are correctly positioned before proceeding to the next step.
- Turn on the wind and put in the Bobbin.
A lot of sewing machines come with an automatic winder for bobbins. To use the bobbin spooler put the thread spool onto the pin that holds the spool. Follow the instructions in the Machine (or in the manual), which will show you how to guide the thread towards the bobbin spinner. Then, slide the thread’s end through the small hole in the Bobbin before placing the Bobbin in the winder’s Bobbin.
Slide or click the Bobbin’s winder into the position for winding. Make sure you hold the thread’s ends and push the pedal to start winding the line into the Bobbin.
Stop winding when the Bobbin is filled. Cut the thread, remove the Bobbin out of the winder and then put it inside the Machine beneath the cover of the Bobbin. The bobbin slot may differ among the different machines. Therefore, be sure to consult the manual for precise instructions regarding inserting the Bobbin in case of difficulty.
UPTHREADING
Begin by looking at the top threading, and follow the instructions while you trace the steps that the thread moves through. The line will begin at the uppermost point of the Machine where the spool is located and will continue until the bottom of the Machine, where the thread joins the needle.
Most machines follow the same pattern through tension wheels and hooks until they reach the needle. The thread has to be introduced from the front and back, and it should be pulled through smoothly with a small amount of tension but not overly tight.
The LOWER THREADING BOBBIN
The Bobbin connects the threads on the lower end and tension. Check your manual for accuracy because different machines use various casings and bobbins. The Bobbin is put in from the top or top part of your Machine.
Top loading bobbins drop straight into the casing (photo on the right) connected to the Machine. The front loading bobbins are put into a container (photo to the left) and then put into the.
The Bobbin’s winding is a crucial element of the process; therefore, ensure you can wind your Bobbin.
It is usually performed by placing your main thread in the spool pin, winding it around a guide for cables, and then over to the bobbin winder. Every Bobbin will have an opening at the top where you can insert the line to begin the process.
The bobbin winder should be pushed across and begin winding! Specific machines also require you to disconnect the flywheel to stop the needle from moving up and down as you knit.
Create your thread and choose the stitch you want to use.
- Both threads have to be removed before you begin sewing. To lift the line from the Bobbin:
- Use your hands to pull the needle thread in place.
- Utilize your left hand to turn the handwheel located on one side of the Machine.
Make it one complete turn so that the needle can take the thread from the Bobbin and raise it over the surface of the hand. The line that is exposed to the Bobbin must be looped.
Pull the loop to open the threads of the Bobbin.
Now you have two threads, one going through the needle plate at the top and the other thread coming via the container on the bottom.
It’s almost time to begin sewing. Make use of the dial for stitch selection to select your preferred stitch. To verify that the Machine is threaded correctly, it is possible to run several stitches on a scrap of fabric.
Make your material.
Once you’re ready to start sewing, ensure your fabric is prepared. The sewing machine’s needle should be raised, and the material must be aligned to the hand. The majority of your fabric is to the left of the Machine to ensure better sewing. Utilizing the lever for the presser foot to lower it, you can drop it to keep the fabric.
START STITCHING UP WITH A SAMPLE
It’s always recommended to try your Machine on a piece of fabric before you purchase. The most suitable material, to begin with, would be stiff cotton. Cotton quilting is easy to stitch and can be bought as large fat quarters, which are tiny pieces of cut fabric. Calico is also an affordable sewing fabric that is easy for novices. This fabric with a cream color is typically somewhat stiff, and since it’s a light color, it is possible to make notes on the material while you sew.
Check BEFORE YOU START
- Speed – Before taking action, verify whether your foot pedal is equipped with an option to control the speed. For instance, my Janome has a rate and slow button, which I can alter. There aren’t all machines with this feature; however, if it is on yours, it will help when you first sew. Make it slow. If your Machine doesn’t have speed adjustment, put your foot on the pedal very softly when it’s time to stitch.
- Settings To start your first seam, set your sewing machine onto a straight hem with an 0 width with a length of 3.0. If your Machine is equipped with preset settings and it isn’t adjustable, you can choose a medium-length straight stitch. ‘